the Camino Santiago de Compostela,
fondly referred to by many as "The Way."
fondly referred to by many as "The Way."
Since 2006, I have tried to walk every year,
and sometimes more than once a year.
When I talk to people who are walking the Camino
for the first time,
one of the first questions walkers ask is
"What equipment will I need, and where do I get it?"
Walking the Camino can be as expensive
or inexpensive as you make it.
Some people will want to stay in 5 star hotels
and have a transport company carry their luggage.
Other pilgrims will carry a lightweight pack
and sleep on benches and mats or in albergues along The Way.
Some will buy the latest expensive technical equipment.
Others will simply pack from the clothes they already own.
Every pilgrim, rich or poor,
will need a certain amount of standard equipment.
Honestly, most people could walk using what they have in their closets.
There is no need to purchase expensive gear at all.
However, some purchases can make your walk easier.
If you are interested in knowing what I've learned
over the years I have been walking,

I purchase mid weight woolen socks, like SmartWool.


Your feet ARE going to swell.
You can always put on another pair of socks,
but you can't make your shoes larger.
I generally wear a size 6.5 these days
and I buy a 7.5 for the Camino.
They work great.
Third Purchase is GEL INSERTS.
To me, some type of gel inserts are a must!
They protect the bottom of your feet from the constant pounding
and from pebbles on the path.
I buy Motion Control by New Balance.
They are not inexpensive.
I think I paid about $40 this year.
They're worth every penny!
The gel inserts will take up some of the extra room in your shoes.
I like Motion Control inserts
because they protect the bottom of my feet
from rocks and pebbles,
they keep my foot aligned in the shoe
and this protects my ankles from turning in or out.
To use, pull out the standard insert in each shoe
and replace it with the gel insert.
If necessary, trim them, but beware…
if you trim them too small,
you'll create a place where your skin will get pinched
so go slow and take care.

FEATHERWEIGHT JACKET
I carry a featherweight hooded jacket to layer for wind and cold.
It's more like a windbreaker, really.
If it is extremely cold,
I put on my Altus Poncho over everything and stay toasty.


CUDDLE DUDS
I used to carry one pair of Duddle Duds, merino, or silk long johns.
I got the Cuddle Duds at J. C. Penneys.
You can find silk long johns online or at REI
or other outdoor shops.
Last Camino my merino shirt wore out,
and so I bought a bamboo shirt.
I'm sold on bamboo.
It's a bit heavier, but warm, sturdy, and comfie.
here is a list of my Camino gear
with explanation of why I chose each.
First Purchase is SOCKS:
In cool weather, I often take 2 pair of wool socks and 2 pair of liners.

with explanation of why I chose each.
First Purchase is SOCKS:
In cool weather, I often take 2 pair of wool socks and 2 pair of liners.

I purchase mid weight woolen socks, like SmartWool.
They are cushioned.
Wool socks only have to be washed once each week.
I wash the liners nightly.
The photo shows liners with separated toes.
This is not necessary.
In fact, I've heard these actually CAUSE blisters,
so I avoid them.
I just thought the photo was interesting :)
I do not always wear the wool socks.
If it gets hot, I sometimes only wear the liners.
If I am walking in hot weather, June through August,
I may decide to pick up some inexpensive cotton socks
in one of the many China stores or open markets along The Way.
But I always begin my Camino with wool,
even in summer.
Until your feet get used to walking 20-plus kilometers per day,
they will appreciate the cushion.
Buy your socks before you go to try on shoes.
Second Purchase is SHOES.
On the Santiago Camino Forum there is a constant discussion
about whether or not the Camino warrants wearing hiking boots.
Each person has their own preference.
I can only give you my opinion.
To me, the Camino is not a mountainous hike..
it is a "trek."
It is nothing like the Pacific Coast or Appalachian Trails.
There are not many places where you are scrambling
up and down rocky slopes.
Most of the time,
you are ambling along at a comfortable pace
on grassy or dirt pathways.
There are are few stony places, and some steep places,
but not enough of those to warrant heavy hiking boots, in my opinion.
70% of the pilgrims I've met who ended their Camino early
ended it because of horrendous blisters.
The blisters were caused by ill-fitting shoes.
I can not stress this enough.
You must have appropriate shoes.
This means shoes that FIT
and shoes that are BIG ENOUGH -
because almost everyone's feet ARE going to swell.
Most of us are not used to walking
continuously for 6-8 hours each day
over a variety of track.
And then there are the little places that rub... and rub... and rub.
You know what I'm talking about.
Sometimes it is the heel.
Sometimes the toe.
Sometimes it's where the shoe ties.
Often, with trekkers,
it's the toe rubbing on the front of the shoe
as you walk down a steep incline.
If you'd like to see what can happen to feet when proper shoes aren't worn,
do a Google search on "foot blisters!"
Here's a good example:

YOUR SHOES MUST FIT!
For the Camino, unless you have worn boots your entire life,
Wool socks only have to be washed once each week.
I wash the liners nightly.
The photo shows liners with separated toes.
This is not necessary.
In fact, I've heard these actually CAUSE blisters,
so I avoid them.
I just thought the photo was interesting :)
I do not always wear the wool socks.
If it gets hot, I sometimes only wear the liners.
If I am walking in hot weather, June through August,
I may decide to pick up some inexpensive cotton socks
in one of the many China stores or open markets along The Way.
But I always begin my Camino with wool,
even in summer.
Until your feet get used to walking 20-plus kilometers per day,
they will appreciate the cushion.
Buy your socks before you go to try on shoes.
Second Purchase is SHOES.
On the Santiago Camino Forum there is a constant discussion
about whether or not the Camino warrants wearing hiking boots.
Each person has their own preference.
I can only give you my opinion.
To me, the Camino is not a mountainous hike..
it is a "trek."
It is nothing like the Pacific Coast or Appalachian Trails.
There are not many places where you are scrambling
up and down rocky slopes.
Most of the time,
you are ambling along at a comfortable pace
on grassy or dirt pathways.
There are are few stony places, and some steep places,
but not enough of those to warrant heavy hiking boots, in my opinion.
70% of the pilgrims I've met who ended their Camino early
ended it because of horrendous blisters.
The blisters were caused by ill-fitting shoes.
I can not stress this enough.
You must have appropriate shoes.
This means shoes that FIT
and shoes that are BIG ENOUGH -
because almost everyone's feet ARE going to swell.
Most of us are not used to walking
continuously for 6-8 hours each day
over a variety of track.
And then there are the little places that rub... and rub... and rub.
You know what I'm talking about.
Sometimes it is the heel.
Sometimes the toe.
Sometimes it's where the shoe ties.
Often, with trekkers,
it's the toe rubbing on the front of the shoe
as you walk down a steep incline.
If you'd like to see what can happen to feet when proper shoes aren't worn,
do a Google search on "foot blisters!"
Here's a good example:

YOUR SHOES MUST FIT!
For the Camino, unless you have worn boots your entire life,
you do not want hard-soled boots like you'd wear to climb mountains.
You want a FLEXIBLE shoe that has good support,
has a cushioned sole,
and which has a deep and wide toe box.
This is VERY important!
Your toes need to be able to spread.
You also want a shoe that dries quickly.
There's nothing worse than putting on
a pair of cold, wet, stiff leather boots first thing in the morning.
I do NOT like Goretex.
It not only keeps moisture out,
it keeps moisture in.
And your feet are going to sweat after a few hours.
For these reasons, I always choose New Balance trail running shoes.
New Balance makes a shoe on a shoe-last with extra toe space -
it is called SL-2.
For an explanation of shoe lasts, see the following links.
Please do not pass over it, it is important information:
General Shoe Last Explanation
If you have narrow feet, this may not be important.
But my feet are wide and short.
The SL-2 show last has a narrow heel,
so the shoes don't slip,
and a wide, deep toe box
so the toes don't rub against each other.
With the wonderful fit of New Balance,
you can walk out of the store and directly onto the Camino
with no time for breaking in the shoes.
They fit from the first moment you put them on.
I had only one blister on my first Camino.
It was after my first trek over the Pyrenees
and it was because I did not wear my liner socks.
In past years, I bought whichever version of #2 Shoe Last shoes New Balance made. If a shoe comes on the #2 Shoe Last, I can be sure
it is extremely lightweight and comfortable.
These are not waterproof, but if these trail runners do get wet,
they will dry by morning.
For my 2022 trek I bought New Balance 840v4. I chose black, but they also come in grey and I believe in white.
has a cushioned sole,
and which has a deep and wide toe box.
This is VERY important!
Your toes need to be able to spread.
You also want a shoe that dries quickly.
There's nothing worse than putting on
a pair of cold, wet, stiff leather boots first thing in the morning.
I do NOT like Goretex.
It not only keeps moisture out,
it keeps moisture in.
And your feet are going to sweat after a few hours.
For these reasons, I always choose New Balance trail running shoes.
New Balance makes a shoe on a shoe-last with extra toe space -
it is called SL-2.
For an explanation of shoe lasts, see the following links.
Please do not pass over it, it is important information:
General Shoe Last Explanation
If you have narrow feet, this may not be important.
But my feet are wide and short.
The SL-2 show last has a narrow heel,
so the shoes don't slip,
and a wide, deep toe box
so the toes don't rub against each other.
With the wonderful fit of New Balance,
you can walk out of the store and directly onto the Camino
with no time for breaking in the shoes.
They fit from the first moment you put them on.
I had only one blister on my first Camino.
It was after my first trek over the Pyrenees
and it was because I did not wear my liner socks.
In past years, I bought whichever version of #2 Shoe Last shoes New Balance made. If a shoe comes on the #2 Shoe Last, I can be sure
it is extremely lightweight and comfortable.
These are not waterproof, but if these trail runners do get wet,
they will dry by morning.
For my 2022 trek I bought New Balance 840v4. I chose black, but they also come in grey and I believe in white.
I'm not saying you have to buy New Balance,
but those SL-2 shoe lasts are perfect for the Camino!
Everyone has their favorite brands;
Keen, Merrill, and Ahnu.
Whatever shoe you decide on,
try the shoes on over both pair of socks.
You want them to fit comfortably,
with no tight places.
You want a LARGE toe box
so your toes can spread when you walk.
With your socks and shoes on,
and laced up,
you should be able to wiggle your toes FREELY.
This is not like walking to the grocery store.
Your feet are going to be hitting the ground 6 to 8 hours each day
and those toes will want to spread,
something they're not used to doing in our regular,
walk-to-the-refrigerator world.
A large toe box giving your toes room to spread
will prevent them from rubbing together and causing blisters.
I buy my shoes 1 to 1.5 sizes larger than I generally wear.
The shoe salesperson will try to talk you out of this.
I do not listen.
Everyone has their favorite brands;
Keen, Merrill, and Ahnu.
Whatever shoe you decide on,
try the shoes on over both pair of socks.
You want them to fit comfortably,
with no tight places.
You want a LARGE toe box
so your toes can spread when you walk.
With your socks and shoes on,
and laced up,
you should be able to wiggle your toes FREELY.
This is not like walking to the grocery store.
Your feet are going to be hitting the ground 6 to 8 hours each day
and those toes will want to spread,
something they're not used to doing in our regular,
walk-to-the-refrigerator world.
A large toe box giving your toes room to spread
will prevent them from rubbing together and causing blisters.
I buy my shoes 1 to 1.5 sizes larger than I generally wear.
The shoe salesperson will try to talk you out of this.
I do not listen.
I repeat:
DO NOT LISTEN
Your feet ARE going to swell.
You can always put on another pair of socks,
but you can't make your shoes larger.
I generally wear a size 6.5 these days
and I buy a 7.5 for the Camino.
They work great.
Third Purchase is GEL INSERTS.
To me, some type of gel inserts are a must!
They protect the bottom of your feet from the constant pounding
and from pebbles on the path.
I buy Motion Control by New Balance.
They are not inexpensive.
I think I paid about $40 this year.
They're worth every penny!
The gel inserts will take up some of the extra room in your shoes.
I like Motion Control inserts
because they protect the bottom of my feet
from rocks and pebbles,
they keep my foot aligned in the shoe
and this protects my ankles from turning in or out.
To use, pull out the standard insert in each shoe
and replace it with the gel insert.
If necessary, trim them, but beware…
if you trim them too small,
you'll create a place where your skin will get pinched
so go slow and take care.
It's possible Motion Controls won't be available this year.
There seems to be issues getting them,
as with many things post-Covid.


Doesn't matter which insert as long as it's made to cushion your feet against rocks
Expect to pay between $65 and $160 for shoes.
Expect to pay another $35-40 for the gel inserts.
THESE ARE YOUR MOST IMPORTANT INVESTMENTS
because if your feet fail,
your Camino is over.
Don't try to cut corners on shoes.
Spend what it takes.
In the past belonged to a club called The Clymb.
They offer 70-80% discounts throughout the year
on various types of gear.
If you join (joining is free)
and send out invites to your friends,
and if your friends make a purchase,
you get credit toward your next purchase.
Here is an invite from me, though I' not positive the link is still good:
http://www.theclymb.com/invite/DeborahCarvalho
An example of the money you can save:
One year I paid $160 for a pair of shoes.
Then, I found the exact same pair on The Clymb for $45!
I bought a pair for the following year's Camino!
Be sure to try on the make and model
in a walk-in shop before you order,
so you know exactly what you're getting.
BACKPACK.
Your next major purchase will be your backpack.
Originally, I went to REI and other mountaineering shops
and tried on many packs before I settled
for my Arcteryx Khamsin Backpack.
It was 30L and that was plenty big!

A couple of years ago I bought a new pack.
I purchased a Gregory Jade 28L pack.
Again, I chose a top loading pack.
I like a top loader when traveling in Europe.
It protects you more from pickpockets,
and you can stuff more into it.
Some people use a large pack, like a 65L,
and say, "Oh, but I only filled it half full."
That is not good.
If items are shifting around inside your pack,
you are more likely to get blisters.
Your pack should be packed tightly
in order to work correctly
and keep your body from injury.

Good backpacks come in several lengths,
which was important for my 5'3" frame.
Mine has an internal frame
and holds the weight close to the back comfortably.
The shoulder straps are nicely padded,
as is the waist belt.
I love this top-loading pack
with only one zippered compartment on the outside
which I used for my Nysil pack cover.
The attached adjustable straps were convenient places
to carry my water bottles and trekking poles.
This pack has a hydration sleeve built in, but I generally don't use it.
I choose to carry a bottle and fill it along the way.
Some people like lots of zippers and sections in their pack.
I prefer one big top-loading bag.
I then organize my items in easy-to-grab stuff sacks.
There are less zippers to fiddle with and less weight to carry.
It's also not as easy a target for pickpockets.
Joe, my walking partner, chose an Atmos 38L pack.
It does have a place for his hydration system
and he was very happy with the pack.

When you're shopping for your backpack,
remember, this will be a part of your body for the next 6 weeks,
so it needs to be VERY comfortable.
Tell the sales person that WEIGHT and COMFORT
are the two major considerations.
You want a lightweight pack and you want one that FITS.
Try the packs on FULL.
You should try each pack on with
at least as much weight as you plan to carry.
I suggest 10% of your total body weight.
A good gear shop
will have weights for you to put into your pack
so you can see what it feels like.
Put the weights in the pack, put it on,
and walk around the shop for at LEAST 10 minutes,
noticing things like "Where does it rub?"
There will be a blister there in a few hours!
"Does it pinch me anywhere?"
Another blister!
"Does it pull down on my shoulders?"
Muscle cramps!
Most of the weight should fall on your hips, not your shoulders.
Ladies, find a pack that has an adjustable strap in the front
that is comfortable above your breasts.
This is VERY important.
If you feel any problems at all,
take the pack off and try another.
I can't stress this enough.
If you have to visit several stores
to find just the right pack, do it.
You won't be sorry.
If the salesperson seems clueless or pushy,
ask for another salesperson with more experience.
Don't be talked into a purchase that doesn't FEEL right.
Listen to your body.
A small problem now
will become a huge issue on the Camino.
NEVER buy a pack online
unless you have tried it on in a store first.
You must try it on with weight in it to know it will fit.
Another thing to pay attention to is the size of the pack.
I suggest you do not check your pack.
I suggest you carry it on the plane with you.
A 28L pack will usually fit as a carry-on.
A 65L pack will not.
More than one pilgrim has arrived in Spain
without their pack,
which was lost by the airline.
This is a pain in the kazoo,
not to mention expensive,
to have to replace everything so you can start walking!
Carry on your pack.
Ask your airlines what their specifications are
and buy a pack that can be carried on board.
Is the pack waterproof?
If not, you'll want to buy a nysil cover,
especially if you're walking in the spring.
There WILL be rain in Galicia.
Covers run around $30.
It should fold up very tiny and fit into the front pocket of your pack
where you can quickly access it.

Once you have found a pack that feels comfortable,
take it home, fill it up,
and wear it around the house for a few hours.
If you find any problems, take it back and start over!
SLEEPING BAG.
Your next item of expense will be the sleeping bag.
If you are walking with an Anniewalkers Camino Trek,
you may not need a sleeping bag.
We will talk about that in the newsletters we send you.
How heavy a bag you need depends on the season.
My first Camino was from September to November.
I get cold easy and I found my Marmot Pounder Plus to be perfect!
Weighing in at 1.5 pounds, and costing $130, it was easy to carry.
I originally bought the Marmot Pounder
which only weighs one pound.
Although this would be a great bag for a summer walk,
I felt it was too lightweight for September
after testing it on my front porch in Oregon.

Marmot Pounder Plus weighs 1.5 pounds
Joe simply took a $35 micro fleece liner and he was plenty warm.

Joe's fleece liner weighed about 1/2 pound
I've since found a down quilt works great for me.
I bought a nice down bag and used it for a few years.
It hurt my heart, but after a few years of carrying the bag,
I cut off the hood and zipper (which I never used)
and now I have a down quilt.
I love it!
I recently saw a nice travel bag at REI
called the Helio 55.
There are two versions,
one made with poly-fill and one with down.
Both are lightweight and compressible,
and either would be perfect for the Camino.
The poly-fill is only $59.


This compresses down to 1/2 the size shown.
In the summer, I'd consider simply carrying a silk liner.
I've seen them on Ebay for as little as $19.

Silk liner weigh only a few ounces and pack up smaller than a cigarette pack
That said, one year in June on the Camino,
I almost froze when the albergue in Obanos
where the hospitalero wouldn't turn on heat or give us blankets
and again in Santo Domingo
when I stayed in an unheated convent.
You walk through so many microclimates,
you just never can predict the Camino weather.
If you do get cold,
you can always wear your clothes to bed
or stuff the foot box of your bag with clothing.
I've also covered myself with my ALTUS poncho
and stayed toasty warm.
Fewer and fewer albergues supply a blanket
because of the bedbug issue,
so I wouldn't go unprepared.
If you are walking with AnnieWalkers,
consider a lightweight fleece,
as you will mostly be staying in places
that provide linens and blankets.
RAIN GEAR
Many Pilgrims simply carry an inexpensive poncho.
For me, this did not work.
They tend to flap around in the wind and
I get cold, especially in the hips,
and needed protection from the water so I don't get chilled.
The first time I walked,
I found a featherweight set
of rain pants and jacket made by Marmot.
They kept me warm and were comfortable.
The second time I walked,
I discovered the ALTUS PONCHO.
I'll never look back!


Altus Ponchos come in 3 colors
Made of heavy plastic cloth,
this poncho covers you and your pack from head to ankle.
It has heavy snap closures and comes with its own stuff sack.
Unfortunately,
I've not found a place to order it in the United States,
but you can order it from the sports shop in SJPP
and pick it up when you arrive.
It costs around €45 now.
You can also find the ALTUS in Zubiri,
in Pamplona, in Sarria, and most large cities.
If you are walking with AnnieWalkers,
check with me for the latest information.
Whatever it takes to get,
this is one of the best things you can buy for trekking.
It keeps you and your pack DRY.
In the end, take whatever works for you,
but take some type of lightweight rain gear.
Trekking Poles
Your last major expense is optional.
Many pilgrims, including myself,
purchase walking sticks along the Camino.
Made by the locals,
they are absolutely indestructible and finely made sticks.
You really need nothing else.
You will find them all along the way
anywhere from 4 Euros up,
depending on their decor.
They make a wonderful keepsake.

Fancy and Plain Sticks
The first time I walked the Camino Frances,
I bought one of these sticks.
It worked fine.
The second time,
I was having issues with my wrists
so I purchased Pacer Poles.

I'm sold on Pacer Poles!
There were positives and negatives to both.
The sticks you purchase along the way
are sturdy, inexpensive, and disposable.
If you lose one, it's no problem, you just buy another.
The pacer poles were great for my wrists.
I liked having two sticks on the rough terrain.
However, other times I felt they were overkill.
That said, they were easy to fold up
and strap to my pack for carrying.
The biggest downside was the fact
that some albergues will not allow poles inside,
no matter how expensive,
so you take the chance of having them stolen
by leaving them outside or downstairs in a barrel.
I didn't like that option and more than once,
moved on to a different albergue so I could carry in my poles.
If I were short on cash,
I'd bypass the trekking poles
and just pick up a stick on the Way.
Other less expensive but necessary gear include the following:
MONEY BELT
Do not even consider walking without a money belt.
I've watched in Italy as a thief sliced a woman's pack,
grabbed her passport and wallet,
and got away while she continued walking,
not knowing she'd been robbed.
Then there was the vomiting thief on the bus in Rome! (Ask me)
A money belt is the only safe place to keep your cash,
your credit card, and your passport.
Keep it on you AT ALL TIMES.
Carry it to the shower with you,
putting it in a ziplock bag to keep it dry.
Never let it out of your sight, and never access it in public.
Carry a small change purse for today's money.
Keep the rest in your money belt.
You can buy these online or at travel stores.
Do not buy the ones that loop around your neck,
as they are easy to cut, grab, and run.
Buy the ones that go around your waist
or the ones that fit over your belt loops and tuck inside
your skirt or pants.

Buy a money belt and USE IT!

One year (2014) I bought two different types of money belt;
one by Tom Bihn.
It looks just like a belt, fits into the belt loops of my Macabi skirt,
and held many folded bills
but I found it really wasn't handy for me.
Money Belt Tom Binh

Now that I'm wearing my Macabi skirts,
I also have been sewing my money belt
into the inside of my skirt.
This could be done in pants as well,
by any dry cleaner or tailor
if you don't sew.
I blogged the instructions if you're interested.
HAT
Depending on the season, you will need a hat.
I have two hats.
One is a Tilly Airflow Hat.
I like it because it can be stuffed into my pack,
it is good for sun, and it's also good for rain.
I wear it UNDER the hood of my Altus Raincoat to make visability even better.
Cost was about $35 on sale.
You can often find them second-hand on Ebay.

My other hat
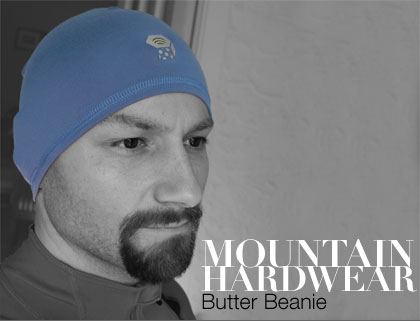
is a featherweight Mountain Hardware Butter Beanie
to keep my ears warm.
The Mountain Hardwear Butter Beanie
is great little headpiece to throw on
or toss in your pocket for a ride or hike.
It's super stretchy,
and has the softness of well-worn flannel.
The inner surface is lightly brushed
and warms as soon as you slide it on.
That same slight brushing on the inner surface
serves to actively wick perspiration away from your skin.
The material that makes up the Butter Beanie
is warming yet it has negligible bulk.
The fabric is thin and the seams lay perfectly flat
and don't bunch.
The entire beanie is stretchy
which helps it cling to your head.
The almost unnecessary stretch band
that goes around the bottom of the headpiece
just seals the deal.
In contrast to other beanies,
this band is slight and doesn't bind around your forehead.
Cost was about $20 on sale.


Honestly,
a ball cap is just as affective as the Tilly
to keep sun off your eyes,
but I love the Butter Beanie.
It's amazingly warm and lightweight.
I also carry a BUFF!
I never go Camino without it.

If you have never heard of this great piece of gear,
go to this link and check out the video: Ways to Wear a Buff
PANTS
I used to take two pair of pants.
I would wear one and carry one.
What's important is that these are lightweight,
quick-drying, and comfortable.
They must not be binding.
Personally I like the travel pants with zip off legs.
I find them for under $6 in the Activewear section of Goodwill here in Portland.

Macabi Skirt
Lately I've been wearing Macabi skirts
instead of pants and I'll never look back.
In fact,
this year I will only take ONE Macabi Skirt.
That's how good the skirt is.
True, they are spendy,
but so are hiking pants,
and the Macabi, to me,
is much more comfortable.
I'm in LOVE with these skirts.
They are comfortable, cool, warm,
have HUGE pockets
that will carry guidebooks,
water, and anything else you need for the day.
They have a secret zippered pocket for cash
and belt loops for my belt.
Here is a link: http://www.macabiskirt.com
These skirts are incredible!
I could have gone the entire 3 months with only one skirt!
They NEVER get dirty.
Literally.
They just don't hold dirt.
When you DO need to wash them,
they dry in 1.5 hours.
They're tough, comfortable, and versatile.
I love my Macabi!
Here is a link to the community wearing Macabi skirts
so you can read what they have to say
and see the various colors and lengths they offer:
http://www.macabiskirt.com/in-the-field
If you buy one, please tell them "Annie Carvalho sent me!"

SHIRTS
I take three shirts.
I wear one and carry two.
I take one long-sleeved shirt for sun or cold weather
and two short-sleeved shirts.
These come in all styles.
What's important to me is that they are lightweight,
quick drying cloth.
I choose to have no buttons or zippers (weight).
Lately I've been wearing merino wool teeshirts.
They are warm in cold weather and cool in hot weather.
They also never seem to need washing.
Hanging and airing each night seems to take away any smell
and I wash my shirts maybe only once a week
when on the Camino.

MICRO-FLEECE SHIRT
Sometimes I carry one heavier micro-fleece shirt to layer if I get cold.
Mine has a zipper at the neckline. However, a few Caminos back I discovered men's cashmere pullover sweaters and now I always take one.
Doesn't matter which insert as long as it's made to cushion your feet against rocks
Expect to pay between $65 and $160 for shoes.
Expect to pay another $35-40 for the gel inserts.
THESE ARE YOUR MOST IMPORTANT INVESTMENTS
because if your feet fail,
your Camino is over.
Don't try to cut corners on shoes.
Spend what it takes.
In the past belonged to a club called The Clymb.
They offer 70-80% discounts throughout the year
on various types of gear.
If you join (joining is free)
and send out invites to your friends,
and if your friends make a purchase,
you get credit toward your next purchase.
Here is an invite from me, though I' not positive the link is still good:
http://www.theclymb.com/invite/DeborahCarvalho
An example of the money you can save:
One year I paid $160 for a pair of shoes.
Then, I found the exact same pair on The Clymb for $45!
I bought a pair for the following year's Camino!
Be sure to try on the make and model
in a walk-in shop before you order,
so you know exactly what you're getting.
BACKPACK.
Your next major purchase will be your backpack.
Originally, I went to REI and other mountaineering shops
and tried on many packs before I settled
for my Arcteryx Khamsin Backpack.
It was 30L and that was plenty big!
A couple of years ago I bought a new pack.
I purchased a Gregory Jade 28L pack.
Again, I chose a top loading pack.
I like a top loader when traveling in Europe.
It protects you more from pickpockets,
and you can stuff more into it.
Some people use a large pack, like a 65L,
and say, "Oh, but I only filled it half full."
That is not good.
If items are shifting around inside your pack,
you are more likely to get blisters.
Your pack should be packed tightly
in order to work correctly
and keep your body from injury.

Good backpacks come in several lengths,
which was important for my 5'3" frame.
Mine has an internal frame
and holds the weight close to the back comfortably.
The shoulder straps are nicely padded,
as is the waist belt.
I love this top-loading pack
with only one zippered compartment on the outside
which I used for my Nysil pack cover.
The attached adjustable straps were convenient places
to carry my water bottles and trekking poles.
This pack has a hydration sleeve built in, but I generally don't use it.
I choose to carry a bottle and fill it along the way.
Some people like lots of zippers and sections in their pack.
I prefer one big top-loading bag.
I then organize my items in easy-to-grab stuff sacks.
There are less zippers to fiddle with and less weight to carry.
It's also not as easy a target for pickpockets.
Joe, my walking partner, chose an Atmos 38L pack.
It does have a place for his hydration system
and he was very happy with the pack.
When you're shopping for your backpack,
remember, this will be a part of your body for the next 6 weeks,
so it needs to be VERY comfortable.
Tell the sales person that WEIGHT and COMFORT
are the two major considerations.
You want a lightweight pack and you want one that FITS.
Try the packs on FULL.
You should try each pack on with
at least as much weight as you plan to carry.
I suggest 10% of your total body weight.
A good gear shop
will have weights for you to put into your pack
so you can see what it feels like.
Put the weights in the pack, put it on,
and walk around the shop for at LEAST 10 minutes,
noticing things like "Where does it rub?"
There will be a blister there in a few hours!
"Does it pinch me anywhere?"
Another blister!
"Does it pull down on my shoulders?"
Muscle cramps!
Most of the weight should fall on your hips, not your shoulders.
Ladies, find a pack that has an adjustable strap in the front
that is comfortable above your breasts.
This is VERY important.
If you feel any problems at all,
take the pack off and try another.
I can't stress this enough.
If you have to visit several stores
to find just the right pack, do it.
You won't be sorry.
If the salesperson seems clueless or pushy,
ask for another salesperson with more experience.
Don't be talked into a purchase that doesn't FEEL right.
Listen to your body.
A small problem now
will become a huge issue on the Camino.
NEVER buy a pack online
unless you have tried it on in a store first.
You must try it on with weight in it to know it will fit.
Another thing to pay attention to is the size of the pack.
I suggest you do not check your pack.
I suggest you carry it on the plane with you.
A 28L pack will usually fit as a carry-on.
A 65L pack will not.
More than one pilgrim has arrived in Spain
without their pack,
which was lost by the airline.
This is a pain in the kazoo,
not to mention expensive,
to have to replace everything so you can start walking!
Carry on your pack.
Ask your airlines what their specifications are
and buy a pack that can be carried on board.
Is the pack waterproof?
If not, you'll want to buy a nysil cover,
especially if you're walking in the spring.
There WILL be rain in Galicia.
Covers run around $30.
It should fold up very tiny and fit into the front pocket of your pack
where you can quickly access it.
Once you have found a pack that feels comfortable,
take it home, fill it up,
and wear it around the house for a few hours.
If you find any problems, take it back and start over!
SLEEPING BAG.
Your next item of expense will be the sleeping bag.
If you are walking with an Anniewalkers Camino Trek,
you may not need a sleeping bag.
We will talk about that in the newsletters we send you.
How heavy a bag you need depends on the season.
My first Camino was from September to November.
I get cold easy and I found my Marmot Pounder Plus to be perfect!
Weighing in at 1.5 pounds, and costing $130, it was easy to carry.
I originally bought the Marmot Pounder
which only weighs one pound.
Although this would be a great bag for a summer walk,
I felt it was too lightweight for September
after testing it on my front porch in Oregon.
Marmot Pounder Plus weighs 1.5 pounds
Joe simply took a $35 micro fleece liner and he was plenty warm.
Joe's fleece liner weighed about 1/2 pound
I've since found a down quilt works great for me.
I bought a nice down bag and used it for a few years.
It hurt my heart, but after a few years of carrying the bag,
I cut off the hood and zipper (which I never used)
and now I have a down quilt.
I love it!
I recently saw a nice travel bag at REI
called the Helio 55.
There are two versions,
one made with poly-fill and one with down.
Both are lightweight and compressible,
and either would be perfect for the Camino.
The poly-fill is only $59.


This compresses down to 1/2 the size shown.
In the summer, I'd consider simply carrying a silk liner.
I've seen them on Ebay for as little as $19.

Silk liner weigh only a few ounces and pack up smaller than a cigarette pack
That said, one year in June on the Camino,
I almost froze when the albergue in Obanos
where the hospitalero wouldn't turn on heat or give us blankets
and again in Santo Domingo
when I stayed in an unheated convent.
You walk through so many microclimates,
you just never can predict the Camino weather.
If you do get cold,
you can always wear your clothes to bed
or stuff the foot box of your bag with clothing.
I've also covered myself with my ALTUS poncho
and stayed toasty warm.
Fewer and fewer albergues supply a blanket
because of the bedbug issue,
so I wouldn't go unprepared.
If you are walking with AnnieWalkers,
consider a lightweight fleece,
as you will mostly be staying in places
that provide linens and blankets.
RAIN GEAR
Many Pilgrims simply carry an inexpensive poncho.
For me, this did not work.
They tend to flap around in the wind and
I get cold, especially in the hips,
and needed protection from the water so I don't get chilled.
The first time I walked,
I found a featherweight set
of rain pants and jacket made by Marmot.
They kept me warm and were comfortable.
The second time I walked,
I discovered the ALTUS PONCHO.
I'll never look back!


Altus Ponchos come in 3 colors
Made of heavy plastic cloth,
this poncho covers you and your pack from head to ankle.
It has heavy snap closures and comes with its own stuff sack.
Unfortunately,
I've not found a place to order it in the United States,
but you can order it from the sports shop in SJPP
and pick it up when you arrive.
It costs around €45 now.
You can also find the ALTUS in Zubiri,
in Pamplona, in Sarria, and most large cities.
If you are walking with AnnieWalkers,
check with me for the latest information.
Whatever it takes to get,
this is one of the best things you can buy for trekking.
It keeps you and your pack DRY.
In the end, take whatever works for you,
but take some type of lightweight rain gear.
Trekking Poles
Your last major expense is optional.
Many pilgrims, including myself,
purchase walking sticks along the Camino.
Made by the locals,
they are absolutely indestructible and finely made sticks.
You really need nothing else.
You will find them all along the way
anywhere from 4 Euros up,
depending on their decor.
They make a wonderful keepsake.
Fancy and Plain Sticks
The first time I walked the Camino Frances,
I bought one of these sticks.
It worked fine.
The second time,
I was having issues with my wrists
so I purchased Pacer Poles.

I'm sold on Pacer Poles!
There were positives and negatives to both.
The sticks you purchase along the way
are sturdy, inexpensive, and disposable.
If you lose one, it's no problem, you just buy another.
The pacer poles were great for my wrists.
I liked having two sticks on the rough terrain.
However, other times I felt they were overkill.
That said, they were easy to fold up
and strap to my pack for carrying.
The biggest downside was the fact
that some albergues will not allow poles inside,
no matter how expensive,
so you take the chance of having them stolen
by leaving them outside or downstairs in a barrel.
I didn't like that option and more than once,
moved on to a different albergue so I could carry in my poles.
If I were short on cash,
I'd bypass the trekking poles
and just pick up a stick on the Way.
Other less expensive but necessary gear include the following:
MONEY BELT
Do not even consider walking without a money belt.
I've watched in Italy as a thief sliced a woman's pack,
grabbed her passport and wallet,
and got away while she continued walking,
not knowing she'd been robbed.
Then there was the vomiting thief on the bus in Rome! (Ask me)
A money belt is the only safe place to keep your cash,
your credit card, and your passport.
Keep it on you AT ALL TIMES.
Carry it to the shower with you,
putting it in a ziplock bag to keep it dry.
Never let it out of your sight, and never access it in public.
Carry a small change purse for today's money.
Keep the rest in your money belt.
You can buy these online or at travel stores.
Do not buy the ones that loop around your neck,
as they are easy to cut, grab, and run.
Buy the ones that go around your waist
or the ones that fit over your belt loops and tuck inside
your skirt or pants.

Buy a money belt and USE IT!

One year (2014) I bought two different types of money belt;
one by Tom Bihn.
It looks just like a belt, fits into the belt loops of my Macabi skirt,
and held many folded bills
but I found it really wasn't handy for me.
Money Belt Tom Binh

Now that I'm wearing my Macabi skirts,
I also have been sewing my money belt
into the inside of my skirt.
This could be done in pants as well,
by any dry cleaner or tailor
if you don't sew.
I blogged the instructions if you're interested.
HAT
Depending on the season, you will need a hat.
I have two hats.
One is a Tilly Airflow Hat.
I like it because it can be stuffed into my pack,
it is good for sun, and it's also good for rain.
I wear it UNDER the hood of my Altus Raincoat to make visability even better.
Cost was about $35 on sale.
You can often find them second-hand on Ebay.

My other hat
is a featherweight Mountain Hardware Butter Beanie
to keep my ears warm.
The Mountain Hardwear Butter Beanie
is great little headpiece to throw on
or toss in your pocket for a ride or hike.
It's super stretchy,
and has the softness of well-worn flannel.
The inner surface is lightly brushed
and warms as soon as you slide it on.
That same slight brushing on the inner surface
serves to actively wick perspiration away from your skin.
The material that makes up the Butter Beanie
is warming yet it has negligible bulk.
The fabric is thin and the seams lay perfectly flat
and don't bunch.
The entire beanie is stretchy
which helps it cling to your head.
The almost unnecessary stretch band
that goes around the bottom of the headpiece
just seals the deal.
In contrast to other beanies,
this band is slight and doesn't bind around your forehead.
Cost was about $20 on sale.

Honestly,
a ball cap is just as affective as the Tilly
to keep sun off your eyes,
but I love the Butter Beanie.
It's amazingly warm and lightweight.
I also carry a BUFF!
I never go Camino without it.

If you have never heard of this great piece of gear,
go to this link and check out the video: Ways to Wear a Buff
PANTS
I used to take two pair of pants.
I would wear one and carry one.
What's important is that these are lightweight,
quick-drying, and comfortable.
They must not be binding.
Personally I like the travel pants with zip off legs.
I find them for under $6 in the Activewear section of Goodwill here in Portland.
Macabi Skirt
Lately I've been wearing Macabi skirts
instead of pants and I'll never look back.
In fact,
this year I will only take ONE Macabi Skirt.
That's how good the skirt is.
True, they are spendy,
but so are hiking pants,
and the Macabi, to me,
is much more comfortable.
I'm in LOVE with these skirts.
They are comfortable, cool, warm,
have HUGE pockets
that will carry guidebooks,
water, and anything else you need for the day.
They have a secret zippered pocket for cash
and belt loops for my belt.
Here is a link: http://www.macabiskirt.com
These skirts are incredible!
I could have gone the entire 3 months with only one skirt!
They NEVER get dirty.
Literally.
They just don't hold dirt.
When you DO need to wash them,
they dry in 1.5 hours.
They're tough, comfortable, and versatile.
I love my Macabi!
Here is a link to the community wearing Macabi skirts
so you can read what they have to say
and see the various colors and lengths they offer:
http://www.macabiskirt.com/in-the-field
If you buy one, please tell them "Annie Carvalho sent me!"

SHIRTS
I take three shirts.
I wear one and carry two.
I take one long-sleeved shirt for sun or cold weather
and two short-sleeved shirts.
These come in all styles.
What's important to me is that they are lightweight,
quick drying cloth.
I choose to have no buttons or zippers (weight).
Lately I've been wearing merino wool teeshirts.
They are warm in cold weather and cool in hot weather.
They also never seem to need washing.
Hanging and airing each night seems to take away any smell
and I wash my shirts maybe only once a week
when on the Camino.

MICRO-FLEECE SHIRT
Sometimes I carry one heavier micro-fleece shirt to layer if I get cold.
Mine has a zipper at the neckline. However, a few Caminos back I discovered men's cashmere pullover sweaters and now I always take one.
FEATHERWEIGHT JACKET
I carry a featherweight hooded jacket to layer for wind and cold.
It's more like a windbreaker, really.
If it is extremely cold,
I put on my Altus Poncho over everything and stay toasty.

CUDDLE DUDS
I used to carry one pair of Duddle Duds, merino, or silk long johns.
I got the Cuddle Duds at J. C. Penneys.
You can find silk long johns online or at REI
or other outdoor shops.
Last Camino my merino shirt wore out,
and so I bought a bamboo shirt.
I'm sold on bamboo.
It's a bit heavier, but warm, sturdy, and comfie.
These days I take merino wool, silk, or bamboo longjohns.
TOILETRIES
Keep these to a minimum, where possible.
Remember, anything you need you can buy on the trail.
Spain is a modern country with plenty of shopping malls in the larger cities.
Here is what I take:

Sometimes I take a deodorant crystal -
I break a regular crystal and take one of the smaller pieces.
Water will soften the sharp edges.
Depending on my MCS,
I also have been known to cut off and smush
deodorant into a smaller container
that I can just apply with my fingers.
You can see an example in my blog on
"What's in Annie's Backpack 2014" here:
What's In Annie's Backpack?

Liggett's Shampoo Bar -
I use this for showering and washing my hair.
Buy it online and keep it in a plastic soap case.
You can use any shampoo bar.
Try Etsy or Amazon for options.

Fels Naptha -
Used for the cold water hand laundry you'll be doing along the Camino.
You can pick it up in any Spanish Tienda
if you can't find it in your town or online.
In Spain, there are several varieties
of cold water clothes washing bars.
Cut it into about 4 or 5 pieces and share with other pilgrims.
One piece will last the entire trip, usually.
In a pinch I've used it for showering with no problems.
I take a toothbrush and toothpaste, and that's about it for sundries,
TOILETRIES
Keep these to a minimum, where possible.
Remember, anything you need you can buy on the trail.
Spain is a modern country with plenty of shopping malls in the larger cities.
Here is what I take:
Sometimes I take a deodorant crystal -
I break a regular crystal and take one of the smaller pieces.
Water will soften the sharp edges.
Depending on my MCS,
I also have been known to cut off and smush
deodorant into a smaller container
that I can just apply with my fingers.
You can see an example in my blog on
"What's in Annie's Backpack 2014" here:
What's In Annie's Backpack?

Liggett's Shampoo Bar -
I use this for showering and washing my hair.
Buy it online and keep it in a plastic soap case.
You can use any shampoo bar.
Try Etsy or Amazon for options.
Fels Naptha -
Used for the cold water hand laundry you'll be doing along the Camino.
You can pick it up in any Spanish Tienda
if you can't find it in your town or online.
In Spain, there are several varieties
of cold water clothes washing bars.
Cut it into about 4 or 5 pieces and share with other pilgrims.
One piece will last the entire trip, usually.
In a pinch I've used it for showering with no problems.
I take a toothbrush and toothpaste, and that's about it for sundries,
unless I've missed something.
I carry a small travel towel.
I take no comb because I cut my hair very short.
I wear no make up
I certainly wear no perfume
PLeASE do not wear perfume!
It's really difficult for people with allergies
to be stuck in a room with
heavily perfumed people.
If I need lotion I use olive oil I find on the way
If you're a guy,
carry a plastic razor and use your liggets to shave with…
works great.
If you're a girl, consider giving shaving a break
and let those legs get hairy!
That's all I can think of for now except for the guidebook.
If I had to choose a single one, it would be this one.
Mine is dark blue - an older issue - and I still use it.

HOW I PACK
I have a system of packing that works great for me.
I stuff my sleeping bag into the bottom of the pack,
not bothering with a stuff sack.
On top of that go separate nylon or net stuffsacks
containing clothing.
Important Note:
Please ignore any advice
to carry your clothes in plastic grocery sacks and use cloth.
The rattling of plastic sacks in the dark morning
is the bane of the pilgrim
and you won't make a lot of friends in the albergues.
For the same reason,
consider leaving the headlamp at home.
A bright headlamp in your eyes at 5 am
doesn't put you in a good mood!
My cold/rain gear goes on the very top for easy access.
The underneath zipper compartment
holds my toothbrush, soap, and towel.
My water bottle and guidebook
go in the pocketa of my Macabi skirt!
My daily cash goes in a small change purse
(maybe €20 for the day)
My big cash is split up between my two money belts.
That's it!
If you choose to take electronics,
well, that's another post.
Consider leaving it all behind...
In the end, you want to look like this:

NOT this!

Please feel free to ask questions or remind me if I've missed anything.
You're going to have a wonderful time!
Buen Camino!
Annie
I take no comb because I cut my hair very short.
I wear no make up
I certainly wear no perfume
PLeASE do not wear perfume!
It's really difficult for people with allergies
to be stuck in a room with
heavily perfumed people.
If I need lotion I use olive oil I find on the way
If you're a guy,
carry a plastic razor and use your liggets to shave with…
works great.
If you're a girl, consider giving shaving a break
and let those legs get hairy!
That's all I can think of for now except for the guidebook.
If I had to choose a single one, it would be this one.
Mine is dark blue - an older issue - and I still use it.

HOW I PACK
I have a system of packing that works great for me.
I stuff my sleeping bag into the bottom of the pack,
not bothering with a stuff sack.
On top of that go separate nylon or net stuffsacks
containing clothing.
Important Note:
Please ignore any advice
to carry your clothes in plastic grocery sacks and use cloth.
The rattling of plastic sacks in the dark morning
is the bane of the pilgrim
and you won't make a lot of friends in the albergues.
For the same reason,
consider leaving the headlamp at home.
A bright headlamp in your eyes at 5 am
doesn't put you in a good mood!
My cold/rain gear goes on the very top for easy access.
The underneath zipper compartment
holds my toothbrush, soap, and towel.
My water bottle and guidebook
go in the pocketa of my Macabi skirt!
My daily cash goes in a small change purse
(maybe €20 for the day)
My big cash is split up between my two money belts.
That's it!
If you choose to take electronics,
well, that's another post.
Consider leaving it all behind...
In the end, you want to look like this:

NOT this!

Please feel free to ask questions or remind me if I've missed anything.
You're going to have a wonderful time!
Buen Camino!
Annie


