Here I go...

One Adventure After Another!
Showing posts with label DIY frugal living. Show all posts

Saturday, January 19, 2013

Bottling my Laundry Soap

Well, I took the lid off my laundry soap this morning
 and found it the consistency of cold jello.

The directions now say to mix this gel half and half with water 
and put it into your containers.


For a while I used a large wooden spoon 
to cut and break it up and try to stir it.
I was amazed just how thick it was!

After a while, 
I just rolled up my sleeves and plunged my arm into the stuff,
This made it a lot easier to break it up, 
using my fingers and hands.


Then, using a funnel, I tried filling my bottles half full, 
as per the instructions.
But the stuff was still so thick, 
it wouldn't go through the funnel. 

Clumps of gel kept clogging up the funnel, 
refusing to go down.

Another problem was figuring out when the bottles were half full.
You can't see through them,
and looking down into them was "iffy."


So next I tried lifting the "clods" with a fork.
This worked, but it was still slow going.
There has to be a better way, I thought...


 Then I figured it out.
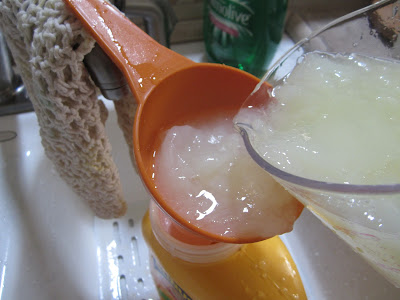
I filled my measuring cup about 1/2 full of gel, 
simply scooping it out of the bucket.


Then, using my hands, 
I reached into the cup
 and squeezed the gel through my fingers,
breaking it up into smaller pieces.


Next, I added an equal amount of cold water to the gel in the cup,
and poured it into my detergent containers.
I didn't bother mixing it, I just poured it in.


 This worked GREAT!
The water made the gel slip easily into the containers.
It also made it possible to get equal amounts 
of gel and water into the container.
That had been difficult because I couldn't see through the bottles.

Soon I ran out of empty bottles.
My mother drinks coffee and I save the plastic containers.
I grabbed a couple of those, 
and filled two with the half gel & half water mixture.


I labeled them clearly 
so we won't wonder later what in the heck this is!


This is how many bottles I filled with one half of the gel.


And here is the other half of the gel, still in the bucket.

I won't add water to this.
I'll just put a tight lid on it and store it like this.
I'll check it in a month or so to be sure it's not evaporating.
So, of course, now I had to try the soap.
The instructions call for using 1/4 cup for a FRONT loading machine.
(Use 5/8 cup for a top loader)

Using a measuring cup, 
I discovered that 1/4 cup is exactly up to the line on the A&H bottles.
So this must be the same measurement used for A&H Laundry Detergent. 
Cool!

Remember to SHAKE THIS WELL before each use!


I used this on a load of whites.
They came out nice and clean and sweet smelling!
A pair of socks were dirty from walking in them around the house.
Normally I would spray them with Spray & Wash.
I didn't spray and wash them, because I wanted to see if this detergent
would get them clean.

It did just as good a job as any other detergent.

Sooo.. that's it.

Yesterday's mixing took about 30 minutes.
Today's bottling took about another 30 minutes 
and would have been quicker
had I figured out how to deal with the problems sooner.

I'm very pleased with the results.
I'll report back in a month on how my clothes are looking.

Please feel free to leave a comment or question.
And remember,


Wednesday, May 09, 2012

From Barcelona!

We arrived in Barcelona exhausted after more than 24 hours in flight. Iberia Air was nice enough. We paid an extra $35 for bulkhead seats so Joe could stretch out his legs. This, to me, is worth every cent. You must do it 30 days before your flight.

The food was ok. The only complaint we really had was that there was no audio so without movies to watch, it made for a longer trip.

For anyone flying into Barcelona, here is some good information.

A taxi from the airport into town will cost you around 50 Euros. OUCH!

Instead of a taxi, follow the signs to pick up baggage, then follow the signs for buses.
Go outside and pick up a bright blue Aero Bus that will take you into the center of town.
This bus cost 5,65 euros each - a great savings!
The first stop is Plaza Espana.
There is a little map above the door inside the bus so you can see where it goes.
Then they stop at another Plaza and a few other stops right in town.

From Plaza Espana, it is just a few steps to the Metro, which you can identify by the bright red triangular or oval signs. You can purchase tickets from machines down in the Metro basement. You can buy 1 ticket, 10 tickets, or day, week, month tickets.  You will insert your ticket into the turnstile, then retreive it as the gate opens.

Be VERY careful in the metro. Keep your hand on your wallet at all times. You may want to put a lock on your backpack until you get on the Camino to discourage busy pickpocket hands.  Even our Pension owner cautioned us about pickpockets and thieves in Barcelona.. so please be careful.

I booked Pension Peiro here in Barcelona. It was 45 Euros for a double private room. It is old and a bit rough around the edges, but the beds are clean. There is a sink and extra blankets in our room, as well as a nice balcony. We share a shower and toilet with 2 other rooms, but so far, I haven´t run into another person. The water is luciously hot!

The management is exceptionally kind here. They have an ordinador ...computer... that you can use for 1 euro for 20 minutes, but the desk clerk told me where there were two computer shops ....locutori... where I can use the computer for 1 euro for an entire hour, so here I am.

Also, I had to purchase bus tickets for the May group and he let me use his private computer, then he telephoned to make a correction for me when I booked two too many tickets. How nice was that¨. I can´t find the question mark on this keyboard.  haha

Let´s see.. what else... the weather is warm and sunny here, with just a few clouds in the sky, so I am going to assume it will be HOT by the time you walkers arrive end of May. I wouldn´t bring too many cold weather clothes at all.

We looked for a Chinese Store, which is like the Dollar Stores in the USA. There, we purchased a fork, a sharp knife, and a corkscrew each for 1 Euro, a change purse for 1,20 euros, and a pair of black Crocs for 4 euros.

I was able to get to the correos - post office - and recognized it by its bright yellow and blue sign. Here´s some good information. When you go into the post office, find a machine that spits out numbers. You will need to know if you are sending or receiving mail and push the appropriate button. Then hold on to your number until they call you.  I mailed a box with my tent, my blow up pad, tent stakes, and two guidebooks from Barcelona to Pamplona and it cost about 8 euros. Not bad and better than lugging it all the way to Pamplona.

Donar Kabobs were first on our menu - for 3 euros each, they are a great dinner and we look for them whenever we are in Spain. While walking around today I saw food of every kind from Patatas Bravas for 1 Euro to Platos del Dia anywhere from 6,50 Euros up to 12 Euros, so it´s easy to find inexpensive food here.

Breakfast and lunch were purchased at one of the many supermercados. We found a baguette about 2 feet long for 85 cents, olives were still 45 cents for a generous bagful, tuna was 1.50 or so for 3 cans with pull tabs. Each can is enough for one serving or one sandwich. We also bought tinto wine in the box for 1.10 euros and orange juice for 1 euro per quart box. I bought 4 yogurts for 2 euros.

Add oranges, apples, and bananas and we were stuffed. Oh yes, and we bought a bagged salad for 1,50 euros and a bottle of dressing for 1 euro so for 2,50 euros we had a HUGE salad with our meal.  The fruit markets are everywhere here, and the fruit is beautiful and inexpensive. Anyone who is vegetarian will do fine in Barcelona!

We couldn not find Fels Naptha for washing our clothes, but I did find some Cocoanut Soap in a bar that is used for baby clothes. It made great suds and washed out easily, so we are happy with it. We hung our stretchy clotheslines out on the balcony and the clothes were nearly dry this morning.

Arriving in Madrid.

If your first stop is in Madrid, you will be in Terminal 1,2,3, or 4. When you first arrive, you will follow the herd to customs, where they do not check your luggage, but check only your passport. Then you go into another room where you again follow signs to the indoors trains that will take you to your next terminal. If you are catching a bus from the terminal, go to an information booth, where usually someone will speak English and help direct you to your bus stop.

If you arrive in Spain via Madrid, then take a connecting flight, you will have to go through security again. You will be asked to place everything in a box and go through a scanner. We opted out of the scary scanner and asked for a pat-down. It was the most exciting thing I´ve experienced in 10 years . hahaha!

I guess our walking sticks were suspicious because the TSA decided to open the box.


Well... I guess that´s all for now. I have photos I´ll post later but cannot do it from here. Tomorrow morning we take our bus to Toulouse and the next day to Moissac. I´ll post again as soon as I can find a computer.

Hasta luego!
Annie

Tuesday, July 19, 2011

Building the CarBed in the Mercury

As my MCS kicked up, I knew I needed to get out of buildings,
and get into the forest or someplace that had clean air.

Yesterday I spent the afternoon directing Joe as he built the carbed in my Mercury Tracer. Having taken out the front passenger seat last week, I wanted to build a bed that would have storage underneath to carry my felting supplies, and that would be accessible, but not necessarily READILY accessible. This is where I'll store fiber and tools that I only need to get to once a week or when I'm starting a new project.

The first thing I did was to fit 3 plastic bins into the space, 
one deep, and two shallow. 
The bins are this type:
At first, they would not fit. Oh NO!  
But when I removed their lids, 
I was happy to find out they fit like a glove! 


Next step was the bed itself. Joe had in his storage an old folding closet door. It was the perfect width and had hinges down the middle. I really wanted something I could open up easily to get to my supplies when needed, so this seemed like a good idea.  We put the two back seatbacks in the down position and slid the door into the car through the trunk. With just a few cuts to fit around the seatback I wanted left in the UP position, it would be perfect!
 We measured and cut and measured and cut 
until the board fit.


As you can see, there was Portland's July rain to deal with. We kept having to run under cover, but eventually we got the board to fit. We also made at least one mistake. You can see a cutout we made, then had to repair when I realized it could be left in for more legroom. Good thing Joe's a carpenter!

The bed now fits on top of the boxes - 
Joe put a couple of 2x4 legs up in front, 
and a brace between them. 
He wired the legs to the frame, 
using the bolts that held the original front seat in place. 
Open and get out supplies

Closed position
It's possible to take the bins completely out also. 
Not easy, but manageable. 
The large bin comes out first, 
then the two smaller ones. 
The small bin on the bottom will hold supplies 
I rarely need to access.

Next, I needed some insulation from the cold coming up from underneath. I was sure I took photos of the padding, but apparently my phone didn't store the photos. So here is a photo from the internet of what I used. It's a blue Walmart camping pad. Cost is about $6. 
I had Joe screw this to the top of the bed on the DRIVER's side, using washers so it wouldn't tear. It's stiff and didn't want to stay in place easily. Now it's attached along one side. We put in three points of attachment. This way I can lift the lid without having the pad go flying off.

Next, I needed a foam mattress. Having purchased a lot of foam for cakes and toys, I knew it was going to be expensive. Last week, I checked at Joann's, where prices are generally affordable, and was horrified to see their couch-sized foam pad was $80. Kowabunga!

I wasn't sure what I'd do about that. Then, while looking at camp stoves at Fred Meyer, I passed their hardware section and of all things, they had camping foam pads, 4 inches thick, for $19.   I was a happy girl!

Last night, I went to buy my foam pad. They had 3. Two were filthy and one was slightly damaged. I asked to speak to the manager and showed him the damaged pad, which had a 1 inch divit in it. He gave me a 10% discount. Hooray!  Getting the pad into my tiny car was, well, interesting, but I managed to get it home where I got my handy-dandy electric carving knife out.  

You can buy an electric knife at charity or Goodwill shops. I think I paid $2.99 for mine. People don't use them much, but they cut foam like butter and I love mine!  With Emma's help taking photos, I marked the foam with a sharpie pen, and began making cuts.
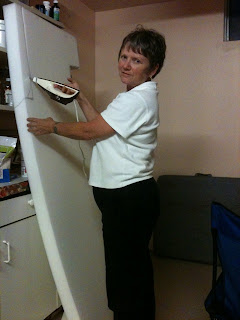
Good Lord, I'm fat! I need to walk off this belly!


I cut the foam to fit tight between the frame 
and the back seatback which is staying UP. 
This way it won't shift. 
 I made a cut around the console 
so I can still shift and use the cupholder 
when I am driving.

And that's it! 
Voila!


Could I have done it without Joe? Probably. The tools we used were a skillsaw, a jigsaw, a screwdriver and a chisel (to move one of the hinges up when we cut off the end of the door). But it sure was nice to have his help! So if you're a gal and doing this, I suggest you grab some guy whose legs aren't painted on and see if he'll help you. It'll make things go much faster if you have someone with experience working with you.

I now have a bed in my little Mercury Tracer! 
I plan on going camping this weekend to try it out
and see if any kinks need to be adjusted. 
I'll take photos and report back.

Until then, I'm working on a felted SunMan face 
to try to get the sun to shine in rainy Portland. 
Here he is. 
Still need to firm him up, 
but I'm liking him!

I'm off to take Emma out for the day.
Until next time, 

Love, 
Annie